Accelerated Testing Tip #1: Sealing cable ports
Introduction to the Series
For my PhD at the Integrated Electronic Systems Lab at Technische Universität Darmstadt I have been running accelerated life tests for a few years now. Life tests can be quite challenging: they can take quite a long time to produce any results; you need expensive equipment to do them properly (e.g. a climate chamber); parts of the test setup is exposed to the accelerating conditions and thus needs be really robust to outlast the device under test. In this short series I will share some tips I have learned along the way and help you to become an accelerated testing ninja yourself 😉.
If you, dear reader, come across a more exhaustive source of tips and techniques, please let me know.
First Tip: Sealing cable ports
When you are running tests inside an oven or climate chamber it is quite common that the device under test needs to be connected to some equipment outside of the chamber. Whether this is to power the device (think of THB tests), to connect it to measurement equipment or different parts of a complex system, it always means that you need to run cables through the chamber wall. This is why these chambers usually [1] come with cable ports.
Now, whether you are running a test at high or low temperatures or at increased humidity levels, you always want to keep the simulated environment inside the chamber. This is especially important for damp heat tests: as the dew point outside the chamber is much lower, humidity will condensate when exposed to the outside and thus will be lost from the chamber. If that happens, the water consumption of the chamber can go through the roof. And of course all that water will make a huge mess in the room where the chamber is placed. So you need to seal your chamber.
The manufacturer of the chamber should be able to supply special plugs for the cable ports. I think they are made from a high-temperature-resistant silicone foam, but I might be wrong here. The important thing is, they can withstand damp heat environments. They are also relatively soft, so they seal the port quite nicely. Once bundle of cables you need to run outside the chambers grows bigger, you can't jam in the plug together with them. One solution is to remove parts of the plug with a sharp knife.
As I didn't want to damage the precious plugs, I found an alternative. For this I bought a 1 m x 1 m sheet of silicone foam online. Now to create a plug, the sheet is cut into approximately 80 mm wide strips. These are then cut to the appropriate length and rolled up to create a plug. This method cost-efficient (you get a lot of plugs from one sheet of silicone foam) and can be adapted to any port diameter.
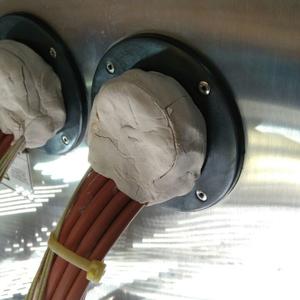
Unfortunately, the plug alone does not seal the port very tight and water vapor can still escape. This is where the plumbers putty comes in. Plumbers putty (I'm using the brand "plastic-fermit", commonly availabel in German home improvement stores) is mainly used to create watertight seals for sinks and drains. It is a soft, pliable substance and can be worked like Play-Doh.
I first use it to create super tight plugs. For that, I place a rope of putty along the strip of foam sheet before rolling it up. The putty forms a seal between the layers of foam sheet, make it harder for the water vapor to find its way through. After all ports are plugged, I seal them with copious amounts of putty. There still will be some crevices between the cables, however, this approach has proven to work quite well in my experiments.
As can be seen in the picture above, these seals can easily last several thousand hours of even the most severe testing environments. However, although the plumbers putty is supposed to be long-term stable up to 100 °C, it dries up and cracks when exposed to water vapor. You can add some more later on to close the cracks or just leave it be.
| [1] | If you are buying a brand-new chamber or oven, ask your supplier for the port options. They do not cost a lot and putting them in afterwards is much more difficult. |

